Glucose Control – Analysis App
Imagine a universe where glucose level numbers are not just data, but dynamic narrators of your health.
This can become reality by using apps to control glucose, thus achieving a better diabetes management. And that’s exactly what the Glucose Control app offers us!
In today’s post, we’ll dive into a deep analysis of this powerful digital tool that not only tracks glucose levels, but turns health management into an informed and motivating experience.
Get ready to discover the advantages of the Glucose Control app and transform the way you manage your health. Check it out below!
How to download and install on your cell phone
To download and install the Glucose Control app on your cell phone, simply follow the step by step below:
- Go to your device’s app store (Google Play or App Store).
- Type “Glucose Control” in the search bar and click on the magnifying glass.
- Once your search result appears, click on the application icon.
- Then tap the “Install” (Android) or “Download” (iOS) button.
- Wait a few seconds while the download completes.
- The Glucose Control app is now available on your cell phone.
- Click on the application icon that will appear on your smartphone screen and see below how to make the first settings.
You will be redirected to another website
First settings
As soon as we open the Glucose Control app, “No records” appears on the home screen. This means that no data has yet been recorded. To begin, it is necessary create a profile, clicking on “Create a new profile”.
Enter the name you want to give your profile, choose one of the available stickers and click save (icon diskette), in the upper right corner of the screen. Ready! Now your profile has been created and you can start recording your glucose measurements.
It is important to mention that the main sections of the Glucose Control app are at the bottom of the screen: Add measurements, graphs and trends, calendar and export data to an excel.
How to record glucose
Now that your profile is ready, to record your first measurement, click on the blue “+” icon in the bottom corner of the main screen. Once you click, you are directed to a new screen, where the date and time appear at the top.
If you wish, the date can be changed, if you want to record measurements that occurred on previous days. Click on the date and choose one. Then, click “OK”. Do the same procedure with the time.
Next, tap “Select a measurement time” to indicate at what time of day the measurement was taken. Afterwards, in “Glucose” field, enter your glucose value.
Finally, you can add your medication, insulin or any comment regarding that measurement. To finish, click save (icon diskette).
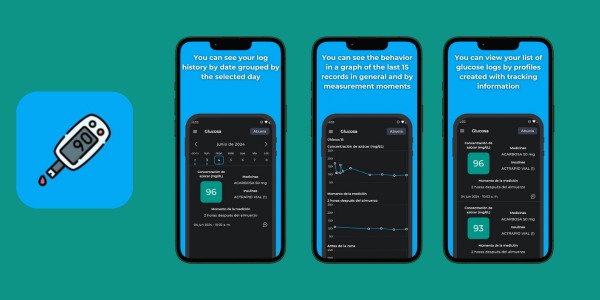
To add new glucose measurements, follow the same procedure. See how all the measurements being recorded will appear on the home screen. In a few clicks and in a simple way, you can have efficient glucose control.
Viewing graphs
After recording some measurements, in the “Graphs” section you can view the graph for each day. Being able to observe the graphs is essential to provide a broader view of glucose levels over time. This makes it easier to pattern identification, allowing for more informed decisions about adjustments to medications, diet and lifestyle.
Furthermore, graphs can motivate you and become effective tools for sharing information with your doctor during consultations.
How to share reports
The Glucose Control app allows users to share with their doctor and healthcare professionals reports complete with all data added during a given period of time.
This facilitates communication between the patient and their doctor, allowing the specialist, even remotely, to evaluate and make adjustments to the medication, if necessary.
Therefore, to send a report, go to the “Export data” section and click on “Export data to an excel”, at the top of the screen. Then, choose where you want to forward the report: WhatsApp, Gmail, Bluetooth, etc. Then, just follow the shipping instructions that will appear on the screen.
After a few moments, the recipient will receive the complete report in Excel format.
Discovering other resources
In addition to the main sections, the Glucose Control app also has other features that can be of great use. These resources are found in the app menu (three dashes). Check out some of them below:
- Laboratory: The app also allows you to record laboratory exams. It is possible to add the values of triglycerides, cholesterol, total, hemoglobin, among others. With this resource you will be able to have better control and record of your laboratory tests.
- Recommended foods: Check out an extensive list of the main foods that experts recommend for controlling glucose.
- Not recommended foods: Check which foods should be left out of your main meals due to their high glycemic index.
- Advice: Get tips and access useful information about food, care, exams and much more.
Conclusion
As you can see,it’s more than an app, it’s an ally in your quest for a healthier life. By discovering the Glucose Control app, you not only manage your diabetes, but empower yourself to make informed decisions and promote a positive change in your lifestyle.
Awaken control, transform your health and have a journey of lasting well-being. Download now and start a new era in caring for your glucose!
 Exercises for High Blood Pressure: Apps to Start Your Workouts
With the right apps, exercises for high blood pressure become easier and safer. Controlling blood pressure is […]
More Improve Your Sleep Quality with 3 Useful Apps: Practical Tips
Transform your sleep quality with the help of technology! The quality of sleep plays a crucial role […]
More Organize Your baby meals with These 3 Apps
Transform organizing your baby meals into a simpler and more practical task with the help of incredible […]
More
